Exchange Server 2016 has many benefits and the migration from Exchange 2010 to 2016 adds more features. The Co-existence is not possible with Exchange Server 2007 or earlier versions. It is only possible with later editions of Exchange Server such as 2010, and 2013. Here, we will talk about how one can migrate mailbox from Exchange 2010 to 2016. To support coexistence, the Exchange Server 2010 must be installed with Update Rollup 11 with Service Pack 3 (SP3).
Contents
Pre-requisites to migrate mailbox from Exchange 2010 to 2016
- Windows Server: Anyone needs to be installed
- Windows Server 2019/2016/2012 R2/2012 Standard or Datacenter
- Windows Server 2008 R2 Standard or Enterprise
- Windows Server 2008 R2 Datacenter RTM or later
- .Net framework 4.5.2
- Windows Management Framework 4.0
- Unified Communications Managed API (UCMA) 4.0
- Supported OS: Windows Server Desktop Experience
- Active Directory: Windows Server 2008 R2 or Later version
- DNS Namespace:
- Contiguous
- Noncontiguous
- Single label domains
- Disjoint
- IPv6:Both IPv6 and IPv4 should be installed.
Before installing Exchange Server, you must ensure that you have RAM or disk space in your system. To support Exchange 2016, you must fulfill the below requirements:
- Processor:64 bits (Recommend processor: Intel or AMD processor)
- Memory:
- Mailbox: minimum 8 GB.
- Edge Transport: minimum 4 GB.
- Disk Space:
Minimum 30 GB to install Exchange and 500 MB for each UM language pack. Minimum 200 MB of space on the System drive, 500 MB on the drive that contains the message queue database.
Steps to Install Exchange 2016
- The first steps to migrate mailbox from Exchange 2010 to 2016 is to download Exchange Server 2016. Try downloading the latest version of Exchange 2016 for a better experience.
- In the File Explorer, locate the Exchange Server 2016 disc image file. Right-click on the file and select Mount.

3. In the DVD drive of Exchange 2016, locate the Setup Right-click on the setup and hit on Run as administrator.
4. A Check for Updates? window will appear. Here, you will find two options:
- Connect to the Internet and Check for Updates
- Don’t check for updates right now
You can select anyone as required. Selecting the first one let the Setup download the updates. If No, further updates are visible, click on the Next button. Here, we are choosing the second one: Don’t check for updates right now.
- A Copying File window will appear. This will copy all the files that setup need to install the Exchange Server 2016. The setup copy all the files to %WinDir%\Temp\ExchangeSetup.
- Now, an Initializing Setup window appears as the Setup is preparing the necessary resources.
- In the next step, you will get the Introduction page. Before proceeding, make sure that you have already done all the steps required during Exchange Deployment. If you haven’t go to “Plan your Exchange Server Deployment” and do all the steps.
- Click the Next button; a license agreement page will appear. Read all the terms, choose “I accept the terms in the license agreement” and then proceed by clicking on Next.
- On the Recommended Settings window, choose “use recommended settings”. This will let the Exchange Server automatically check the solutions for the errors and then click on the Next
- Now, select the Exchange Server Role as the “Mailbox role” you want to install on the computer. Also, select the option “automatically install Windows server roles and features that are required to install Exchange Server” and click Next.
- On the next page, choose the default location or browse the new location to install Exchange Server 2016. Once you are done selecting the location, click Next.
- If you are installing Exchange 2016 for the first time, an Exchange Organization window will open. Specify the name for the Exchange organization and hit on Next button.
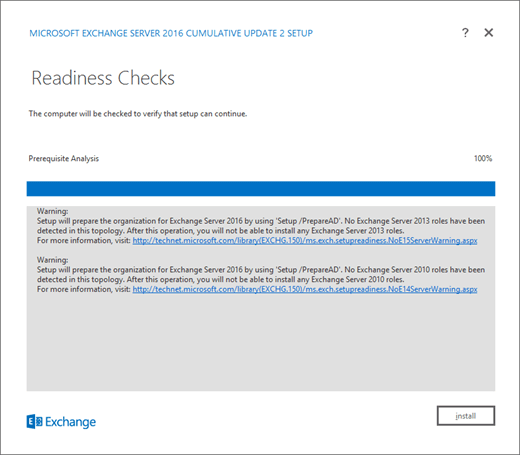
- Disable malware scanning by selecting the NO option and then clicking Next. Now, a new window appears where the setup will carry the verification process. The setup will verify that all the prerequisites are completed.
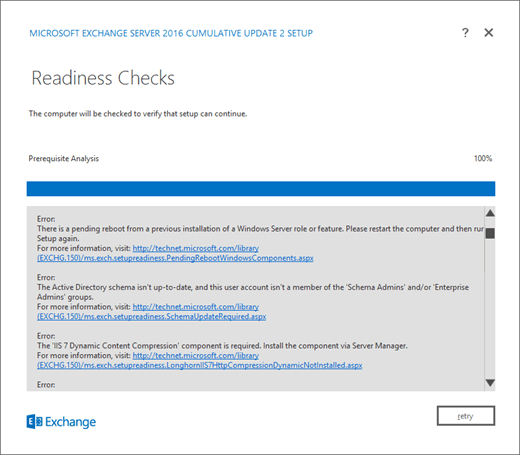
- If not verified successfully click on the Retry Try to resolve the error and again click on Retry. When no errors are visible the retry button will get replaced with Install. Click on the Install button.
- Now, the installations process starts. Once it will complete, click on the Finish button and restart the system.
Create and Assign Migration Permission to Exchange 2016 Mailbox
- Enter the credential for the Exchange and login to the Exchange Admin center.
- Go to mailboxes options under Recipients. Click on the plus sign and then on “User mailbox”.
- Provide the required details on the new user mailbox page and click on Save. This will create a new mailbox in the Exchange.
- Enter into the permissions section and under Admin roles, locate “organization management”.
- Click on the Edit option of the organization management, choose the member as your first mailbox and then click the Save.
Configure Exchange Server 2016
- On the Exchange Admin Center page, go to the “mail flow” section and then go to the “send connectors” option.
- Enter the name of the new send connectors. Choose type as the Internet from the list and then click Next.
- Under network settings, choose “MX record associated with recipient domain” and then click Next.
- Under address space, click on the plus sign; a new “add domain” window appears.
- Type SMTP in the space under type, and enter the star (*) symbol under the full qualified domain name option. Enter the cost, click save, and then next.
- Under “source server”, click on the plus sign and locate the Exchange server 2016. Click on Add button to add the Exchange Server and then the Ok button. Click Finish.
- Under the mail flow section of the Exchange Admin center, go to accepted domains. A window appears, enter the name and the accepted domain. Choose the option Authoritative and hit on the Save button.
- Similarly, under mail flow, go to email address policies. Double click on the Default Policy in the Organization Management.
- An email address policy window opens. Go to the email address format option and hit on the plus symbol.
- Select the accepted domain and choose the domain format. Also, checkmark the “make this format the reply email address” option.
- Click the Save button and Again click on save. A warning box appears, click on OK.
- Locate the Default Policy and under this click on Apply. Again, a warning box appears, click Yes. Once the policy is applied, click on Close.
Once you complete the above steps, you need to configure the external URLs. To configure the external URLs, you need to follow the below steps.
- Under EAC in the Servers section, go to Servers. Select the internet-facing mailbox server and then click Next.
- In the new window, go to Outlook Anywhere. Mention the internal and the external hostname and then click Save.
- In the EAC, under Servers go to virtual directories. Now, in the “select server” option, choose the server from the drop-down list. Similarly, choose the “select type”.
- Select the virtual directory and click on Edit. Under general, fill in the required details and click the Save button. Similarly, do the same step with all virtual directories.
Some service requires the SSL, if it asks then you need to configure the SSL certificate on your Exchange Server.
Set up the Co-existence
Now we need to link the new server to the old. For this, you need to move all your external DNS Records for the email to the new Exchange Server. Mail will now flow into the new Server and then into your old one after Exchange 2010 to 2016 migration. Remove the External URL Value from the old Exchange server. Point any internal email related to Exchange Records to the new server. Now, follow the below steps to migrate the mailboxes and upgrade exchange 2010 to exchange 2016:
- In EAC, go to Recipients, and under Migration click on the plus symbol.
- Choose the option ‘Move to a different database’ and then select the ‘Select the users that you want to move.
- In the Select Mailbox, add the users. Hit on the Next button and enter the name.
- Under the Archive option, choose the “Move the primary mailbox and the archive mailbox if one exists”
- Hit on browse and select Target Database. This will move the mailbox on the new Exchange Server 2016; click
- Enter the user details to which mailbox move reports are to be sent.
- Select Automatically start the batch to migrate mailboxes automatically. Also, select ‘Automatically complete the migration batch’ under the preferred option to complete the batch. Click on
Conclusion: Here, in this blog I have tried to explain how one can Migrate Mailbox from Exchange 2010 to 2016. Here are the complete details to migrate from exchange 2010 to 2016 step by step.
