In this article, we will use PowerShell to create a user mailbox in Microsoft Office 365. This process is more preferred by professional users which also introduces you to the benefits of Office 365.
Contents
What is Office 365?
Office 365 is Microsoft’s product suite, which includes tools like Exchange Online, Excel, PowerPoint, Outlook, etc. Microsoft Office 365 online can be accessed from anywhere or from any device. Office 365 enables a production tool to work seamlessly or reach more people.
Benefits of Exchange 365:
All the tools in Microsoft Office 365 work in harmony with each other, which plays a proper role in any business. There are many advantages of using it like you can open any file from anywhere. You can use 2-step verification process to prevent the account from unauthorized persons.
Some other important advantages are as follows:
- Access your file anywhere.
- The Ability to Work Remotely.
- Subscription-Based Model for Scalable Business Growth.
- Streamlined Business Collaboration.
- Simplified Virtual Communication.
- Reduced Software Expenses.
- Advanced Security Features and secure cloud storage.
- Office 365 Email Benefits.
- File Storage and Sharing Capabilities.
- Business Intelligence.
- 24/7 support.
Create a user account in Office 365 Using PowerShell
Many users use windows PowerShell to create user accounts in Exchange online. Those who like to work in CLI interface more.
Here I am going to tell you how to create an Office365 user mailbox using Windows PowerShell. Follow these steps to create a new user with the help of window PowerShell.
Important Requirement:
1. Install this application: Microsoft. NET Framework and Windows Management Framework to work with PowerShell.
2. Install Microsoft Online Services.
Create user account steps:
1. You need to open Windows PowerShell as an administrator after installing the pre-requisite permissions >> After that you can create a new user.
2. Windows PowerShell will interface appear on the screen.
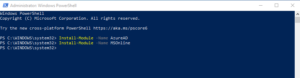
3. In the window power shell you need to type some commands for installing ActiveAD and MSOnline services.
- Install-Module –Name AzureAD
- Install-Module –Name MSOnline
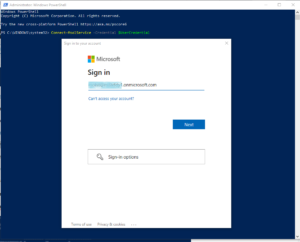
4. Now enter the below command to connect to Office 365 admin account.
- $UserCredential = Get-Credential
5. A new popup will appear on the screen >> type your mailbox ID and password and click the OK button.
6. After logging in with the exchange online mailbox, you need to connect to Msolservice. For run this service enter the given command.
- Connect-MsolService -Credential $UserCredential
7. Create a user account product license and location.
8. Verify the producer license before creating an account >> Type the command to verify.
9. Display an error if you are not connected to MsolService or view a list of all users’ mailboxes.
Type command to create a user
Get-MsolAccountSku

10. Checked the license >> Enter the following command.
New-MsolUser -DisplayName “username” -FirstName “user first name” -LastName “user surname”-UserPrincipalName [email protected] UsageLocation In -LicenseAssignment DomainName:ENTERPRISEPACK

11. If you do not want to assign the license to the user, you can skip this command.
12. If you want to modify the password, you must enter the command after the user mailbox and default password have been created.
Set-MsolUserPassword -UserPrincipalName [email protected] -NewPassword xxxxxxxxxx

That’s it user account is created with the mailbox password.
Final Words
This article explains how to connect Office365 PowerShell with a step-by-step guide in simple language with its benefits. Check what features Office 365 gives you to organize your business emails and other data. If you are not comfortable in the CLI interface, you may also check how to create a user mailbox in Office 365 using Exchange Admin Center.
