
We can create shared mailbox in Microsoft 365 Exchange Online using Admin Center and Windows PowerShell. But Admin Center allows only creating one shared mailbox at a time, there is no option to create shared mailboxes in bulk. With PowerShell, we can bulk create shared mailbox Office 365. As we all know PowerShell is a command-based management tool. In this blog you will be learning how to create shared mailbox in bulk using Windows PowerShell.
Contents
We are going to split this section in two parts:
- Creating Shared Mailbox
- Create Shared Mailbox in Office 365 With User Access Rights.
As we said, we are going to use Windows PowerShell. So first we need to have Exchange Online Module installed in Windows PowerShell, so that we can connect to Exchange Online. Below are the steps for creating shared mailbox using PowerShell.
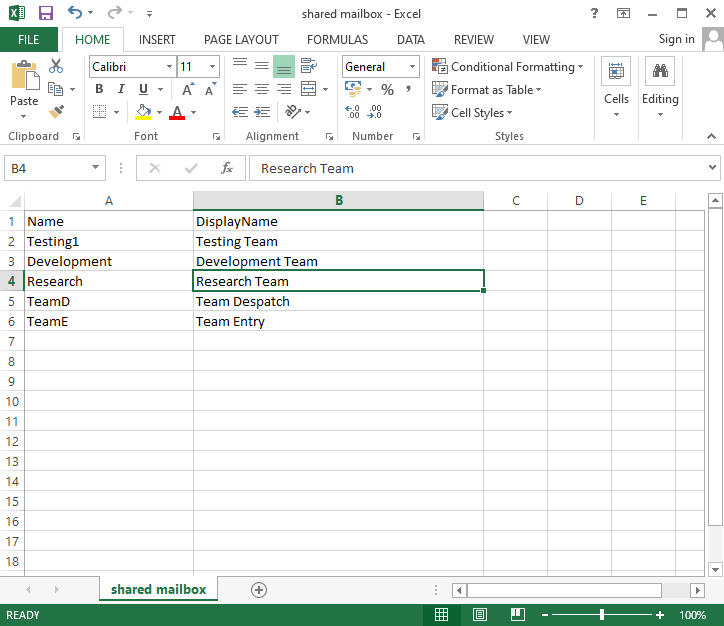
- Create a CSV file containing Name and Display Name for the mailboxes. Name will act as email address and display name will as full name for the mailbox.
- Now open Windows PowerShell as administrator and connect to Exchange Online PowerShell by running the below command.
Connect-ExchangeOnline
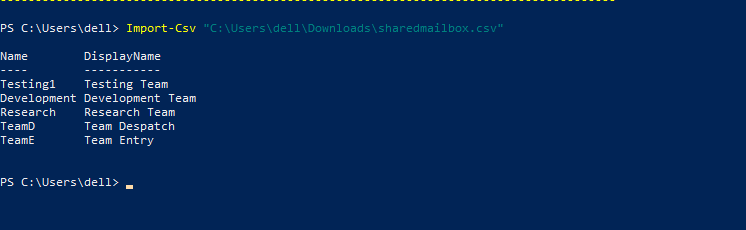
- Once connected, run the import csv command mentioned below to check the CSV file.
Import-Csv "C:\Users\dell\Downloads\sharedmailbox.csv”
- Now run the below command to bulk create shared mailbox in Microsoft 365 with the help of PowerShell.
# Import CSV file
$Datas = Import-Csv "C:\Users\dell\Downloads\sharedmailbox.csv"

# Get all recipients
$Recipients = Get-Recipient -ResultSize Unlimited | select Name

foreach ($Data in $Datas) {

# Check if shared mailbox does not exist
If (($Recipients | Where { $_.Name -eq $Data.Name }) -eq $Null) {

# Create shared mailbox
New-Mailbox -Name $Data.Name -DisplayName $Data.DisplayName -Shared
Write-Host -f Green "Shared mailbox '$($Data.Name)' created successfully."
}
Else {
Write-Host -f Green "Shared Mailbox '$($Data.Name)' already exists."
}
}
- Now you can check the shared mailbox in Microsoft Admin Center if created or not.
- Connect to Exchange Online if not connected.
Connect-ExchangeOnline
- Create a CSV file with the fields Name, DisplayName, User and AccessRight.

- Now to check the CSV file run the below command.
Import-Csv "C:\Users\dell\Downloads\sharedmailbox.csv"

- To bulk create shared mailbox, run the below mentioned command.
# Import CSV file
$Datas = Import-Csv "C:\Users\dell\Downloads\sharedmailbox.csv"

# Get all recipients
$Recipients = Get-Recipient -ResultSize Unlimited | select Name

foreach ($Data in $Datas) {

# Check if shared mailbox does not exist
If (($Recipients | Where { $_.Name -eq $Data.Name }) -eq $Null) {

# Create shared mailbox
New-Mailbox -Name $Data.Name -DisplayName $Data.DisplayName -Shared
Write-Host -f Green "Shared mailbox '$($Data.Name)' created successfully."
}
Else {
Write-Host -f Green "Shared Mailbox '$($Data.Name)' already exists."
}
# Assign permissions on shared mailbox
$Users = $Data.User -split ";"
foreach ($User in $Users) {
Add-MailboxPermission -Identity $Data.Name -User $User.Trim() -AccessRights $Data.AccessRights
}
}
Now you can see that the shared mailboxes will be created with the proper read and manage permissions.
Conclusion:
In this blog, you have learnt how to create Office 365 Shared Mailboxes in Bulk. With PowerShell, Office 365 administrators can easily automate the creation of shared mailboxes in bulk with proper read and manage permissions for the mailboxes. I hope this blog have provide you with valuable insight on creating shared mailbox in bulk using Windows PowerShell. Feel free to reach out to us if you got any query.

