Due to the availability of Microsoft 365 for all platforms like PC, Tablets & mobile, most users currently prefer to use Office 365. Apart from platform indecency, the O365 version always comes with the latest updates, easy migrations, high security, and new apps and features. As we all know, moving to Office 365 probably comes with an empty mailbox, but most users want to keep their old emails as well. Now the question arises of how we can upload PST files into Exchange Online OWA accounts. Most of the users come with PST into Office 365 migration process regarding common quires like:
For globalization of my Business, I want to move all agent’s Outlook PST files database into Office 365 platforms. Please share a quick technique so that I easily complete this process.
I want to perform Outlook on the cloud so that I easily work on it on any place. Is there any process to import desktop Outlook data items into Office 365 account?
How I can upload Outlook 2007 PST file database into Office 365 OWA account free of cost. Is there any manual method available? I want to migrate the PST file into Office 365 on an urgent basis.
After deep analysis, I wrote an article for all users so that users can easily resolve their problems and shift PST files into Microsoft 365 mailboxes.
So, using two different techniques users can import Outlook 2007, 2010, 2013, 2016 and Outlook 2019 version of PST file into Office 365. Let’s start to know both methods one by one.
Contents
1:- Import PST to Office 365 Using Azure Storage Tool (Network Upload Method):
This is the most preferred method by Microsoft to upload archived PST files into Outlook 365 OWA. This method is absolutely free and doesn’t require any paid or third party applications to perform the migration. Follows all updated guidelines step by step to move PST file into Office 365:
A: Assign the Mailbox Import Export Role in Office 365:
First of all, Admin needs to provides the mailbox Import Export Role. For this:
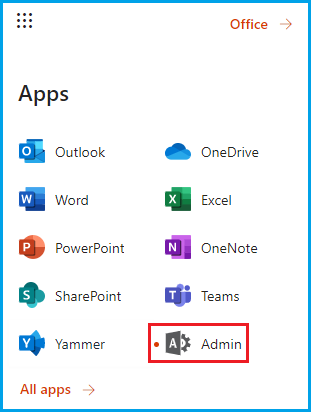
- Open Microsoft Office 365 Admin account and Click on the Admin.
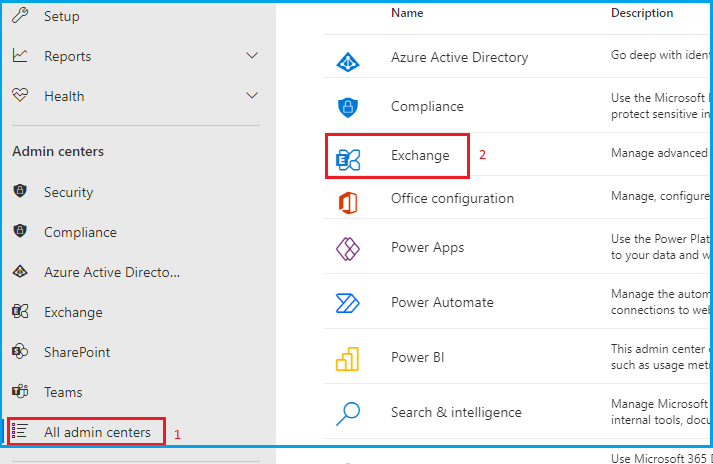
- Click on All Admin Centre and hit on Exchange for opening Exchange Admin Centre.
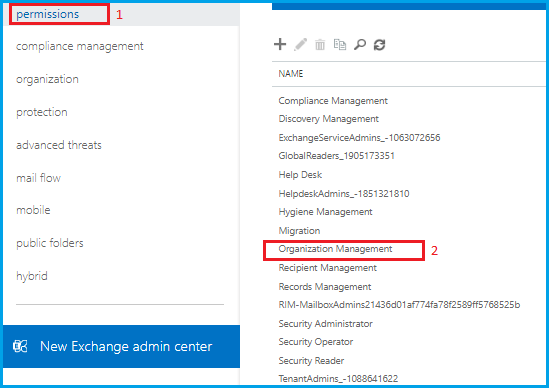
- Here select Classic Exchange Admin Centre >> go to Permissions option and Double click on Organization Management.
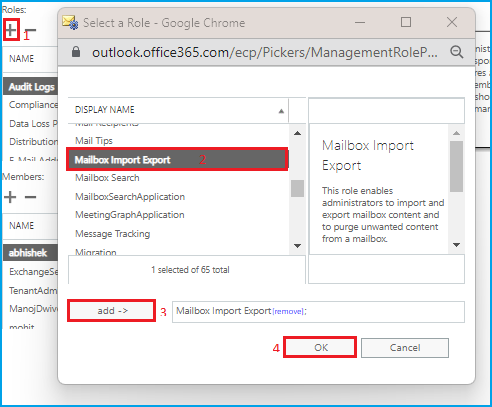
- Now click on +sign in Role section and choose Mailbox Import-export and hit on Add and then press OK.
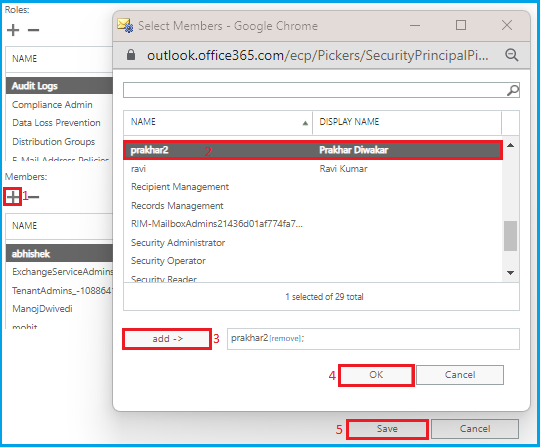
- After that, in member section again select + sign. Here, Admin have to select that user for which you want to create import-export session.
B: Create Job & Upload PST file:
First users have to Run https://protection.office.com links to open Office 365 Security & Compliance window. Now follows below listed option:
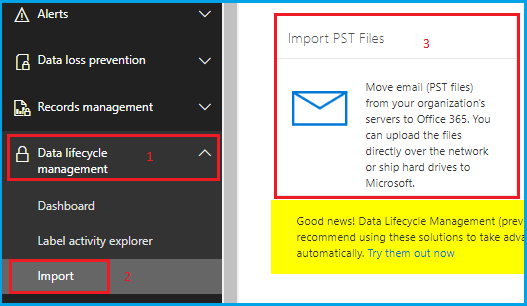
- Choose Data lifecycle management and select Import. Hit on Import PST Files.
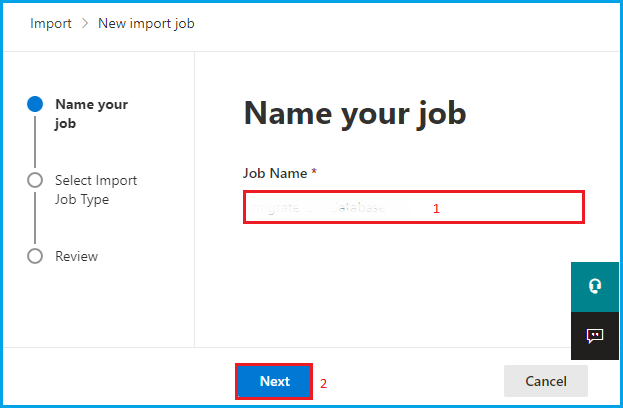
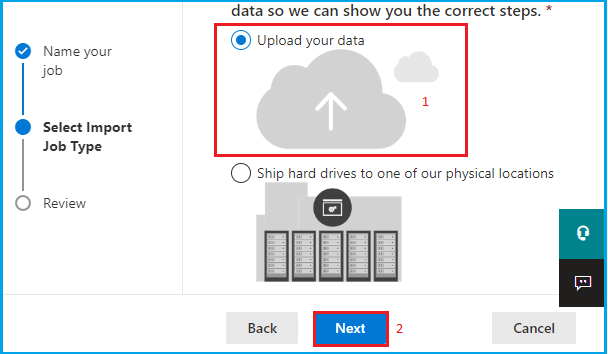
- Now Click New Import Job>> type the job name and press Next.
- Select Upload your data radio button and go to Next.
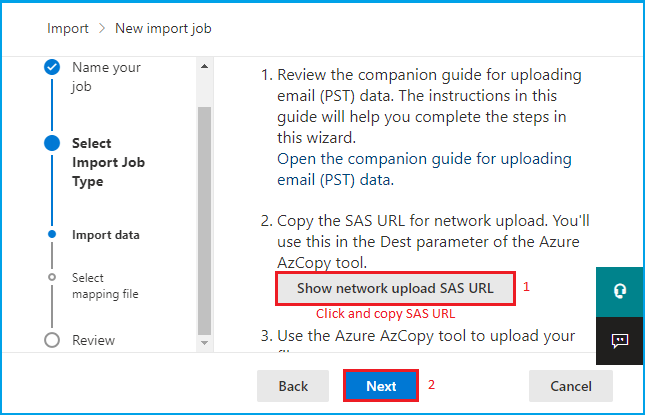
- Now in Data Import section go to step 2 and click on Show network upload SAS URL. When it shows SAS URL, copy and save it securely.
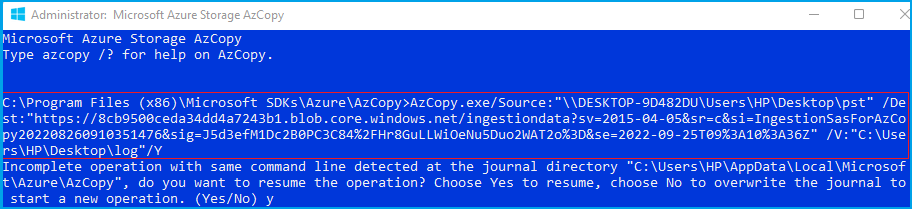
- Now Download & install Azure AzCopy storage tool. After installation Run this tool and run below given command and hit Enter.
AzCopy.exe/Source:”\\Give PST File Network Path”/ Dest:“Pest SAS URL” /V: “give the location to save log file\log”/Y
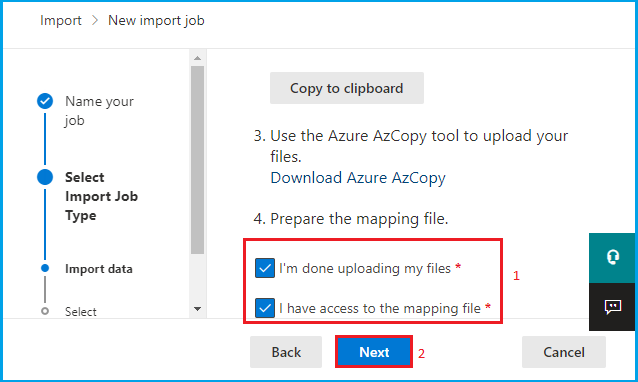
- After that in 4th step enable both option (I’m done downloading my files and I have access to the mapping file) and click on Next.
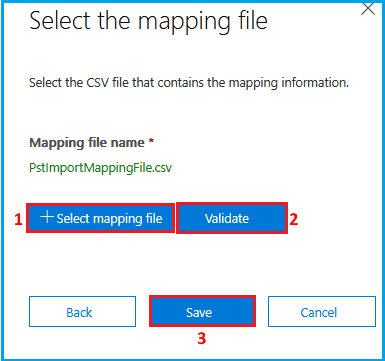
- Now go for creating CSV or PST mapping file. For this, users have to update details in CSV file as it is a screenshot.

- Click in +select mapping file to import csv file and then press validate button to check that there is any issue or not in CSV file. After successfully validate press the Save.
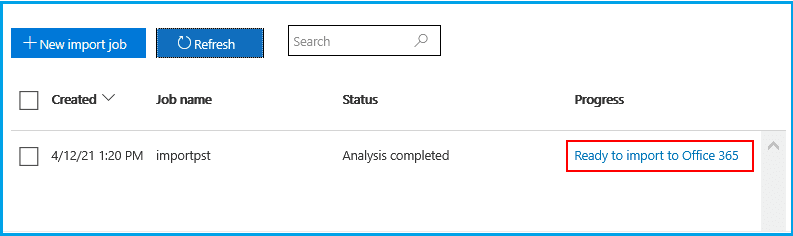
- File Import Job is Now added. You can check the status by clicking on Refresh.
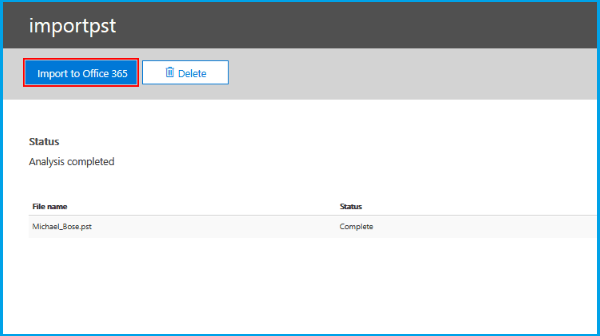
- After process complete select your Upload PST file.
- Press Import PST to Office 365 button.
- Now you get two data filter. Here choose No, I want to import everything.
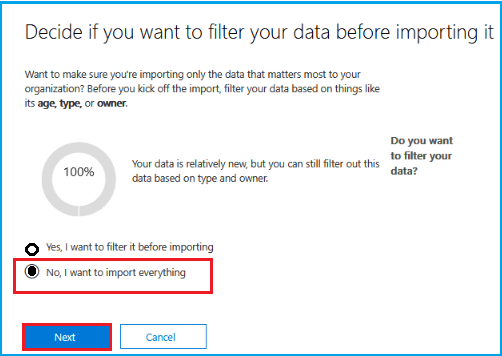
- Now in next windows you know how much database will import in Office 365 account. Here click on Import data. Now PST file database will load and imported in Office 365 account.
2:- Import PST into Office 365 Using Import/Export Method
Microsoft also offers users to upload PST file into Exchange 365 platform by Import/Export technique. If you do not get the accurate result with the help of Network upload method, you can try this solution. So follow all the below listed guidelines and move your old Outlook data files to Office 365 mailboxes in few clicks only.
A:- Configure O365 Account In Outlook:
In this solution users have to configure Office 365 account in Outlook. For This;
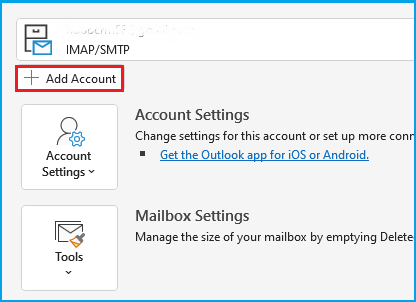
- Open our Outlook and click on File.
- Now click on Add Account. Now in Outlook 2016 and 2019 a new Window will be Open.
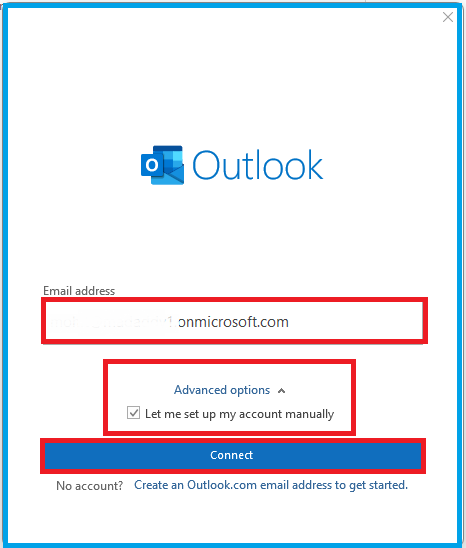
- Fill your Microsoft User ID, Click on Advance options and enable Let me Set up my account manually >> Click on Connect.
- Now Advance Setup Option will be open. Here choose Microsoft 365 >> Fill your password and Click on Singin.
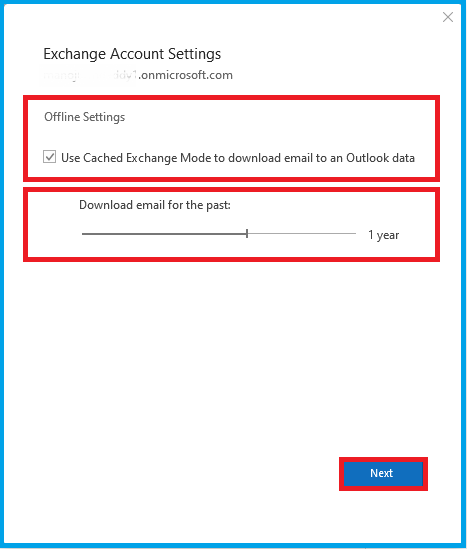
- Now confirm Cache Exchange Mode. If your want a backup your data in your system enable it otherwise you can disable it >> Click on Next tab and Done.
B:- Import PST File into O365 Account:-
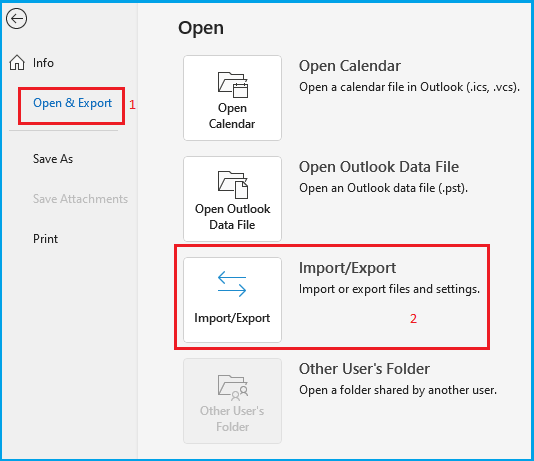
- After restarting your Outlook, click on Add File >> Choose Open & Export >> Click on Import/Export.
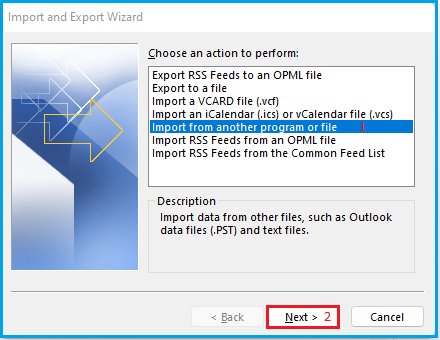
- Now in Import and Export Wizard choose Import from another program or file and click on Next.
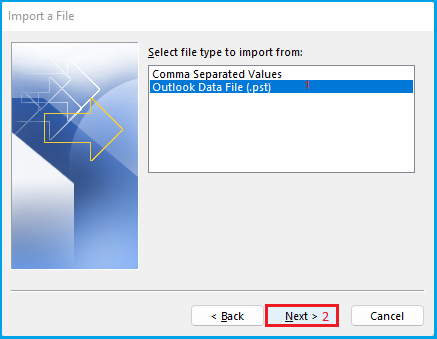
- Now select Outlook Data File(.pst) and click on Next button.
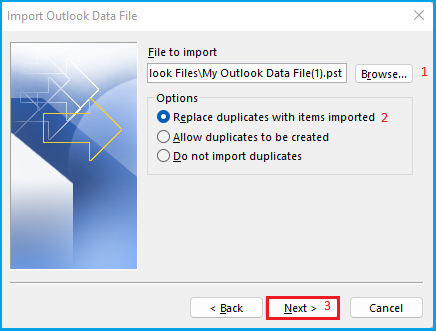
- Click on Browse to provide the location of PST file which you want to import as well as select Replace duplicates with items imported.
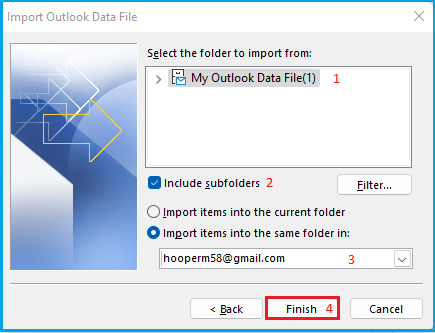
- Now enable Include Subfolder. Choose Import items into the same Folder in: and choose your Microsoft account and hit on Finish.
- All data items will be synchronized. Now you can access all your database on cloud O365 account.
Note: If both processes are not workable for you, can go for any trusted third-party PST to Office 365 Migration tool that can safely upload your Outlook PST file into Microsoft 365 account.
Final Verdict: In this article, I tried to clarify all possible processes to import Outlook PST files into Office 365 account. Users can choose any method and implement them as per their convenience. All methods can successfully use to migrate Outlook PST files to Exchange Online platform. For any dropout message in the comment section.

