Installing Exchange Server is an essential task for businesses looking to streamline their email communication in a secure environment. Microsoft Exchange Server 2019 is the latest one launched by the Microsoft. In this guide, we will go through the steps to Install Exchange Server 2019. First we will understand the requirements and pre-requisites needed to install the Exchange Server. We will setup the Exchange Server on the Azure Virtual Machine running on Windows Server 2022. If you want to learn about setting up Azure VM, then read this article on Create Azure Virtual Machine.
Important: Tired of managing your own servers? We get it – running Exchange on-prem takes time and money away from growing your business. But there’s a better way. With our seamless migration services, we lift that burden, transitioning you to the Office 365 Exchange Online while keeping disruptions at bay. If you are looking for Exchange Server to Exchange Online Migration, feel free to reach out to us at [email protected].
Requirements for Exchange Server 2019
Below are some requirements needed to smoothly install Exchange Server 2019.
- Network and Directory Server:
|
Network and Directory Server |
|
|
Components |
Requirements |
| Active Directory Forests | Windows Server 2012 R2 or later |
| DNS Namespace | Contiguous, Non-Contiguous, Single label domains, Disjoint. |
|
Active Directory Site |
The Active Directory Site should have a writeable domain controller. Also, after you install the Exchange Server 2019, then you cannot delete the Active Directory Site. |
| IPv6 | All the Exchange Server versions since 2013 support IPv6, but IPv4 should also be installed. |
| Domain Controller | Windows Server 2022, Windows Server 2019 Standard, Windows Server 2016 Standard, Windows Server 2012 R2 Standard |
- Hardware:
|
Hardware |
|
| Processor | 64-bit processor |
| Memory | Minimum 128 GB for Mailbox, minimum 64 GB for Edge Transport. |
| Disk Space | Minimum 30 GB of free space |
- Operating System
|
Operating System |
|
|
Exchange Components |
Requirement |
| Management Tools | Windows Server 2016/2019/2022 Standard/Data Center or Windows 10 (64-bit) |
| Mailbox and Edge Transport | Windows Server 2016/2019/2022 Standard/Data Center |
Install Active Directory Domain Services, DNS Server and Create a New Domain Forest.
First, we need to install active directory domain services. This can be done by following the steps mentioned below.
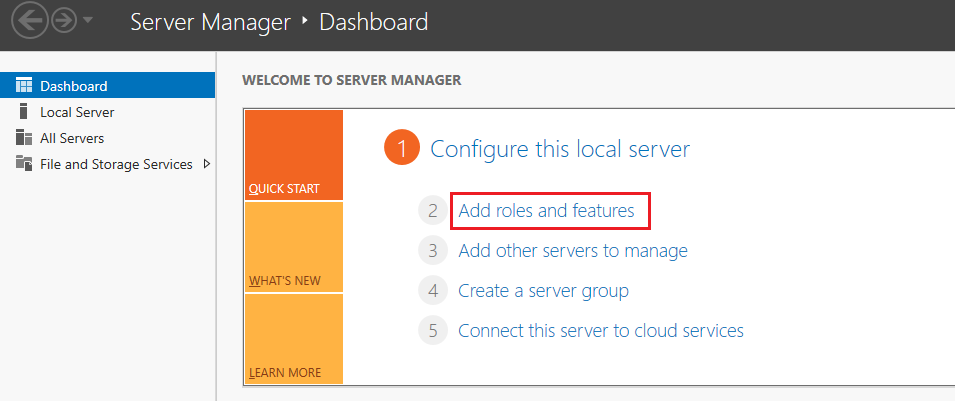
- Search Server manager in the windows search bar and open it.
- Click on Add roles and features.
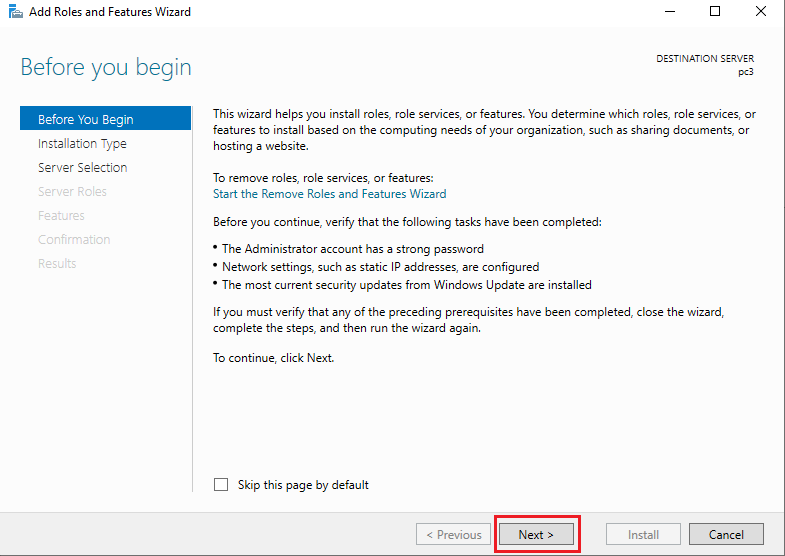
- In the before you begin window, just click on the next button.
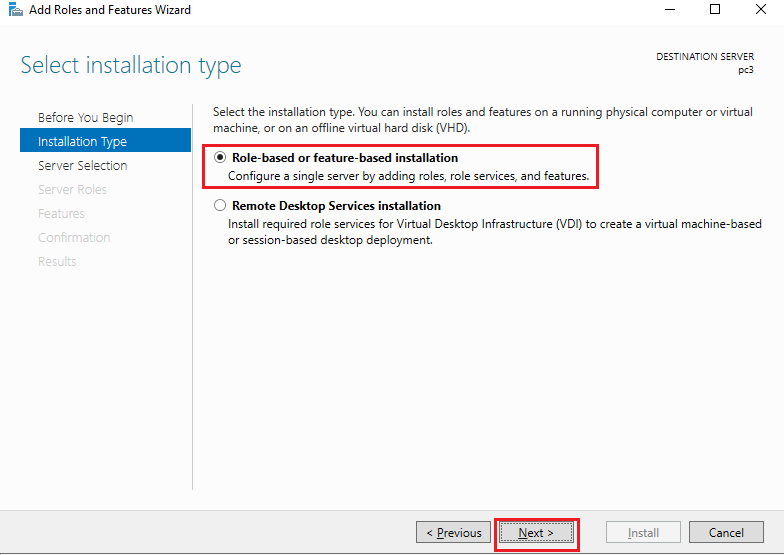
- Choose Role-based or Feature-based installation in the installation type and click on the next button.
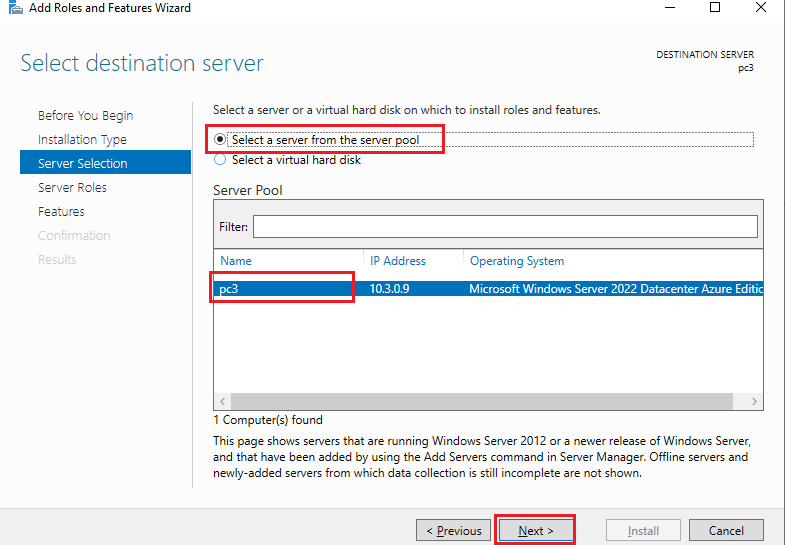
- In the server selection window, choose to select a server from the server pool, then choose your sever and click on the next button.
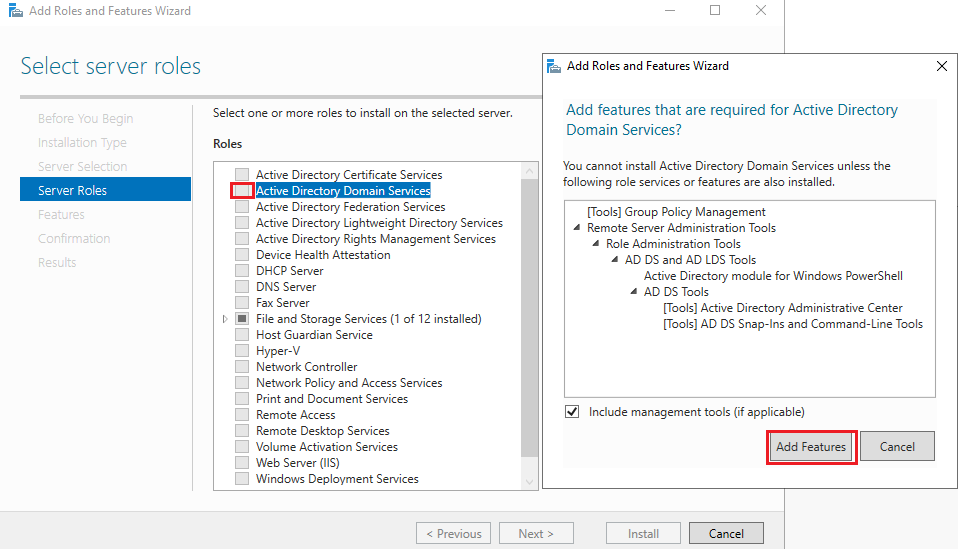
- In the server roles, select Active Directory Domain Services, a new Window will open, click on the Add feature.
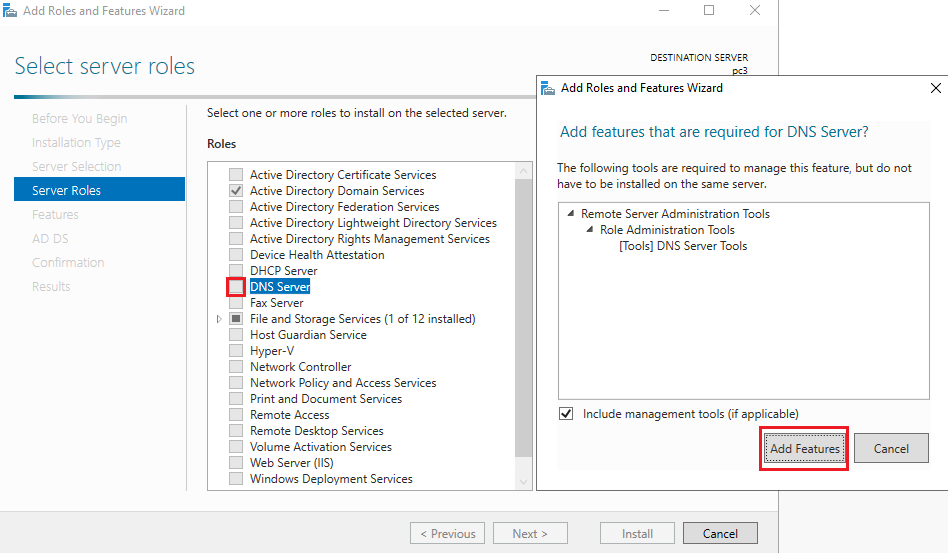
- On the same window choose the DNS Server and click on Add feature when asking.
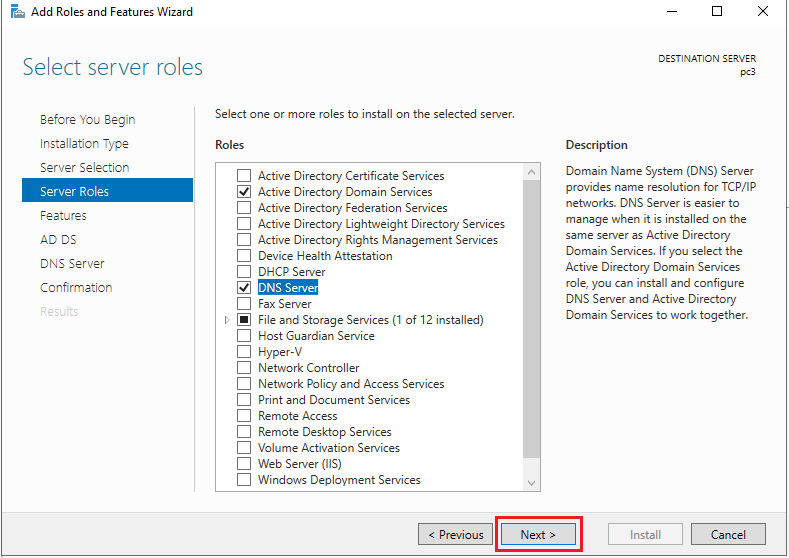
- Once done, click on the next button.
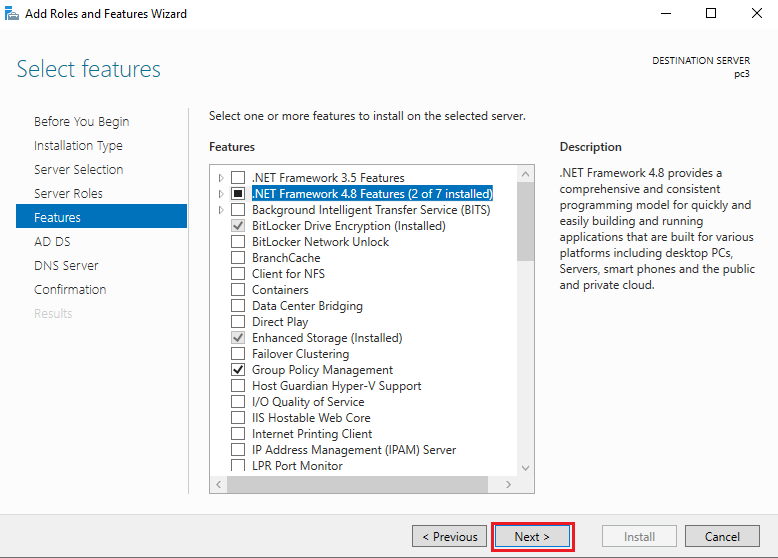
- In the features window, if you need to add more features, then choose otherwise, click on the next button.
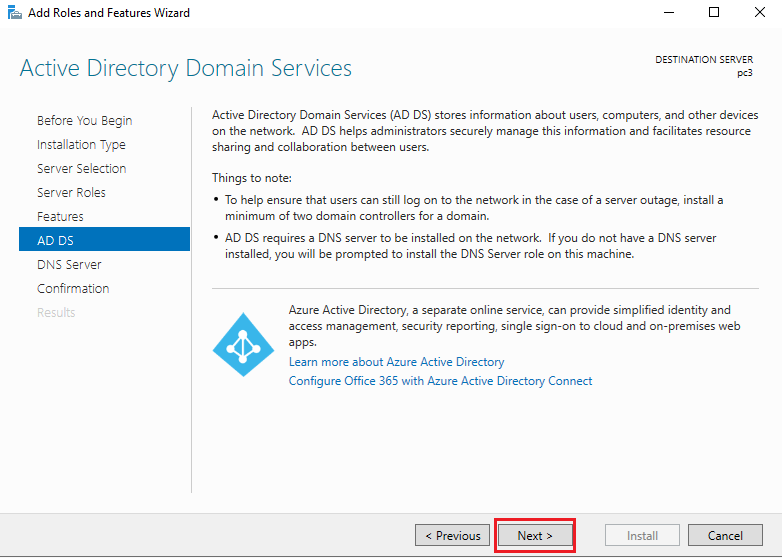
- Again, click next in the AD DS window.
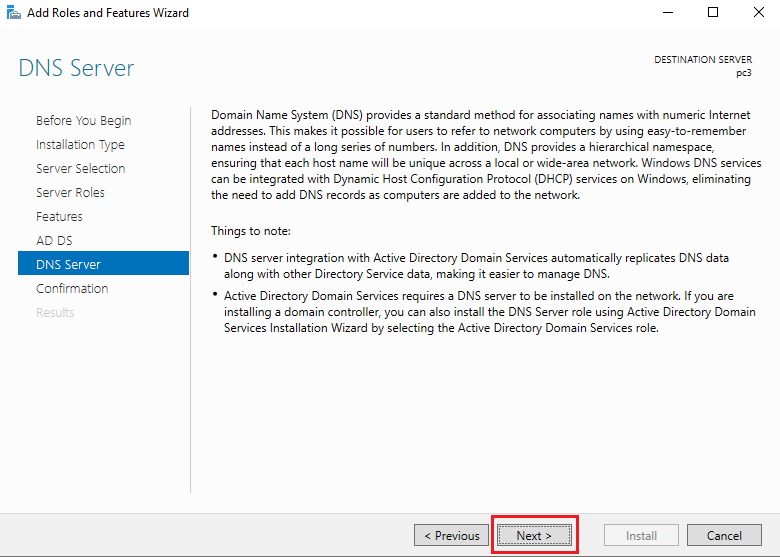
- In the DNS server, simply click on the next button.
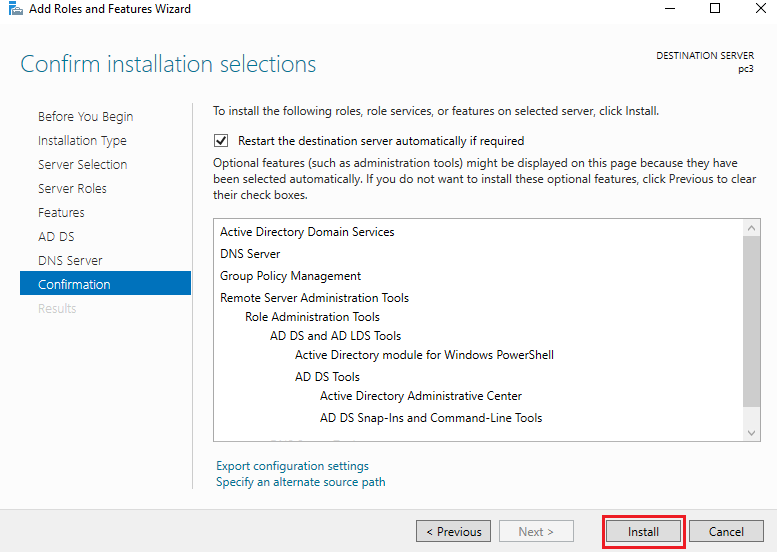
- In the confirmation, window choose automatically restart if required and click on the Install button.
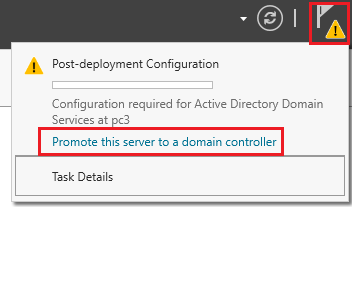
- Once installed, click on the notifications and click on promote this server to a domain controller.
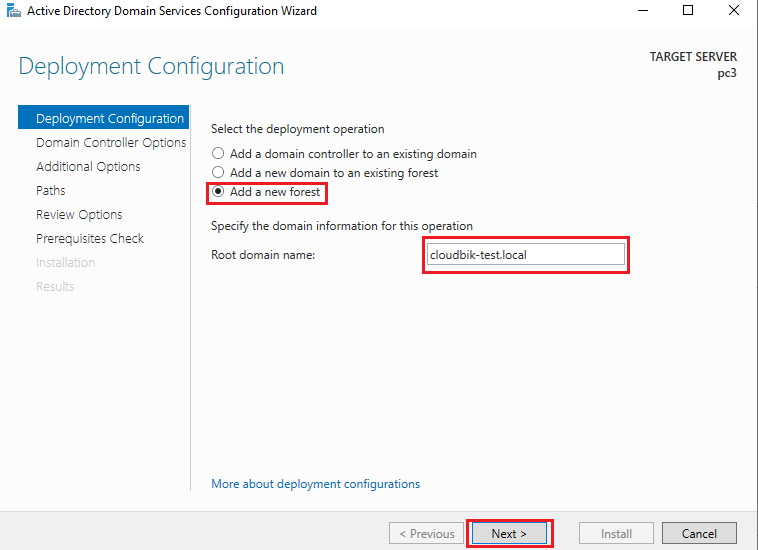
- Click on Add a new forest, type your root domain name like cloudbik.com and click on the next button.
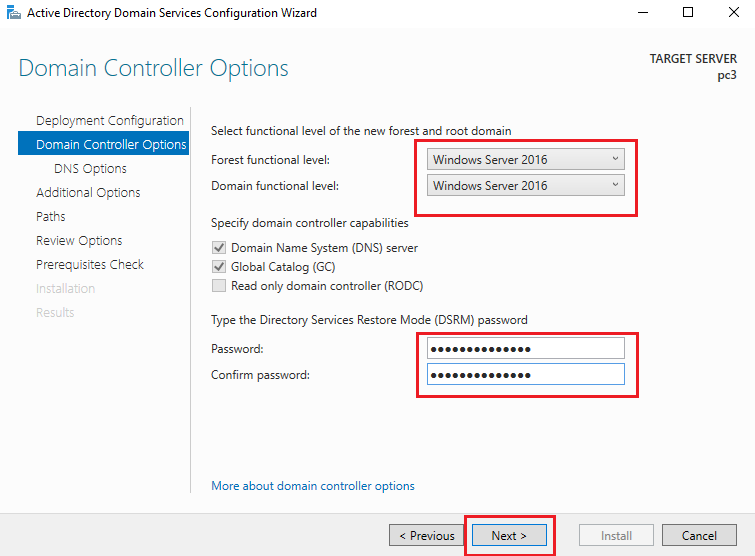
- In the domain controller options window, choose windows server 2016 in both the forest and domain function level, create new password and click on the next button.
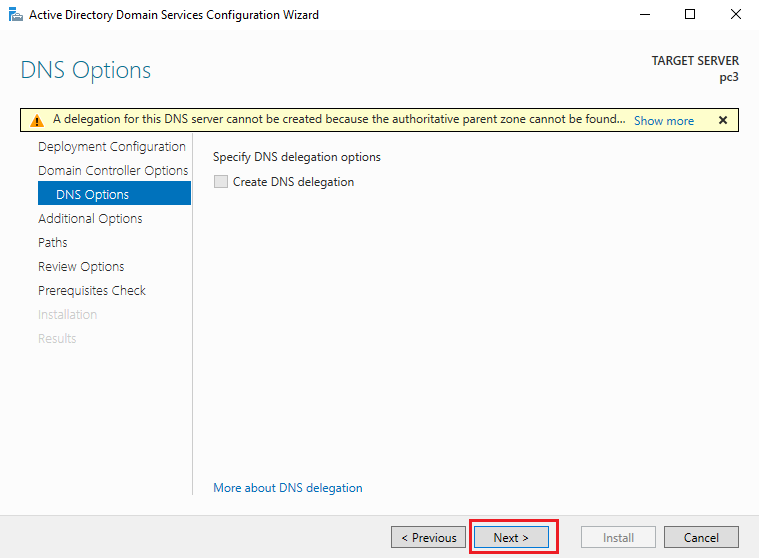
- Simply click next in the DNS options window.
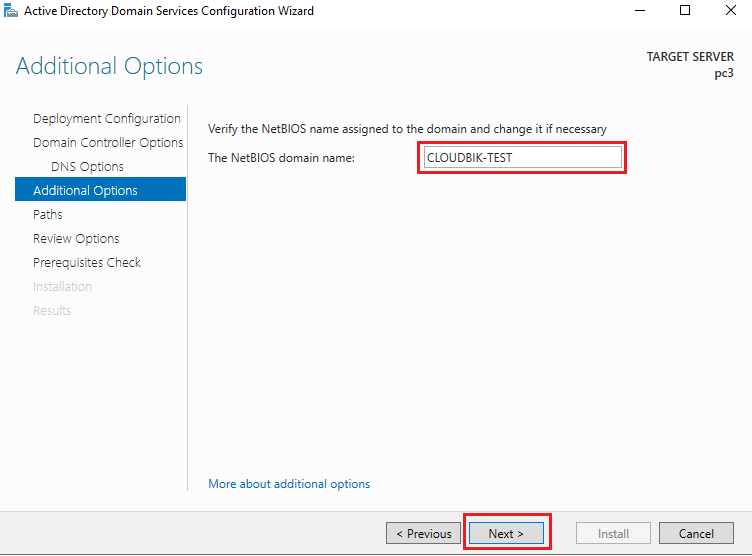
- In the Additional Options window, change the NET-BIOS domain name if required, otherwise leave it as it is and click on the next button.
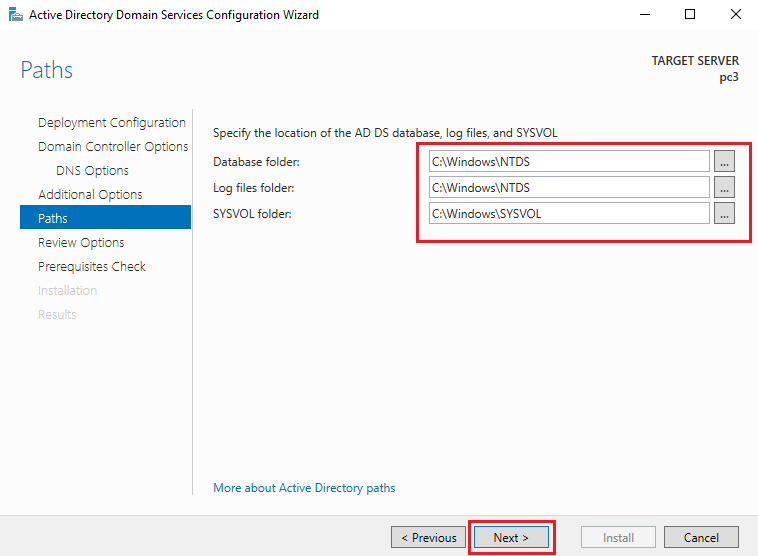
- In the path, change the installation path if needed, otherwise click on the next button.
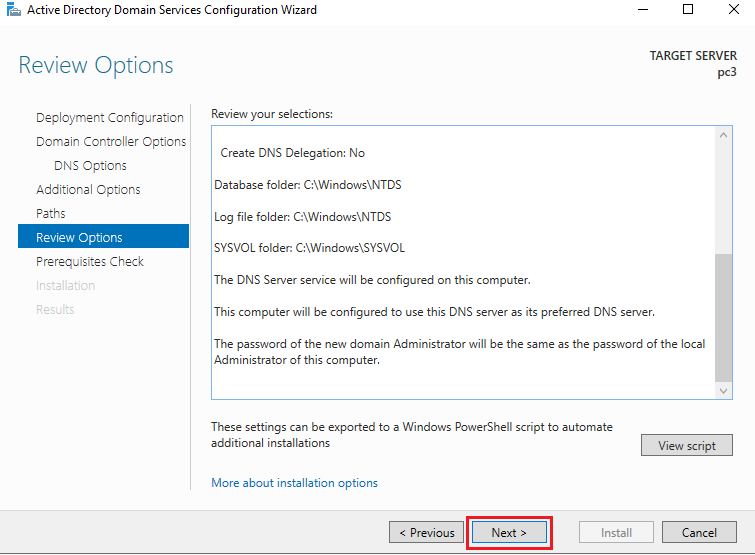
- Now review your selections and click on the next button.
- It will check for prerequisites, one done you can click on the Install button. If there are errors, then you need to correct that. Warnings can be skipped.
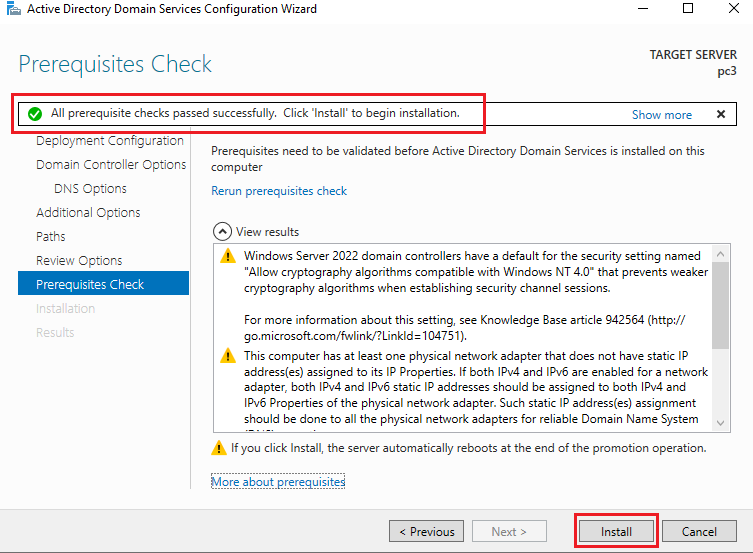
Once done, it will automatically restart. Now your active directory setup has been completed successfully.
Join the server to the domain.
Now we need to join the server to the domain. For this follow the below steps.
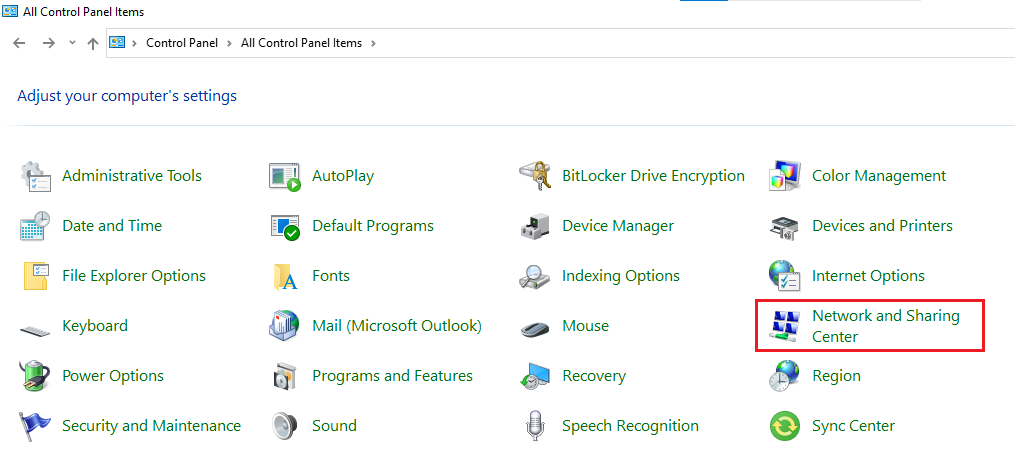
- Open control panel and click on the Network and sharing center.
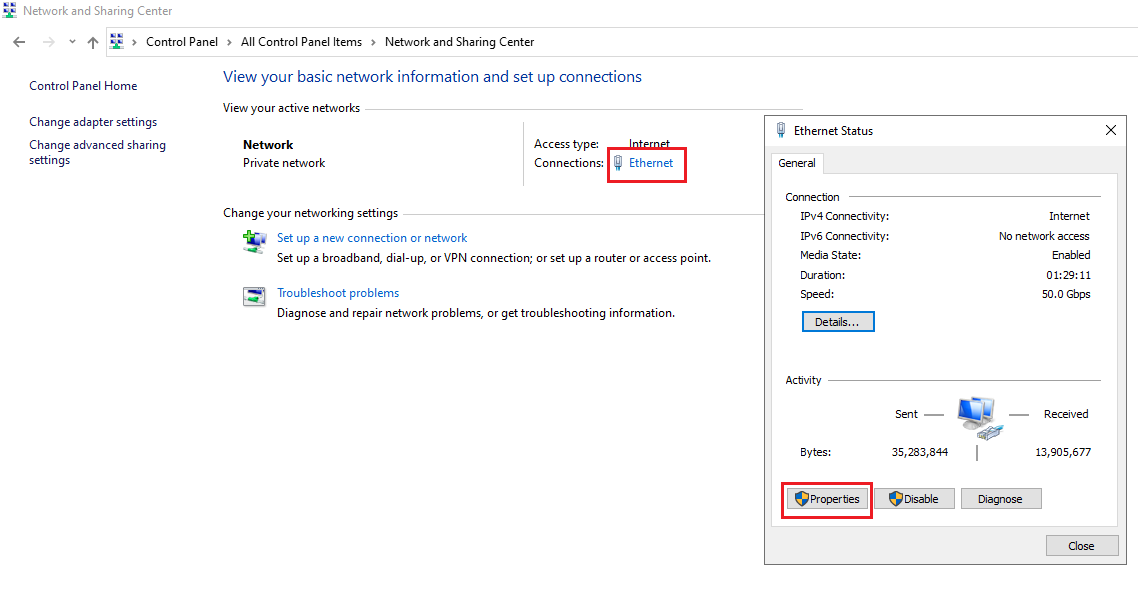
- Now click on Ethernet then properties.
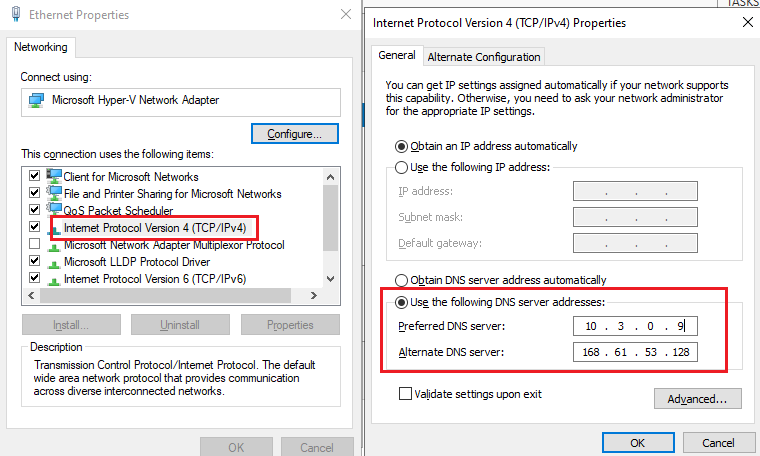
- Double click on Internet Protocol version 4 and in preferred DNS type, fill the server IP address. In the Alternate DNS Server, type the IP address of the PC. Once done, click on the OK button.
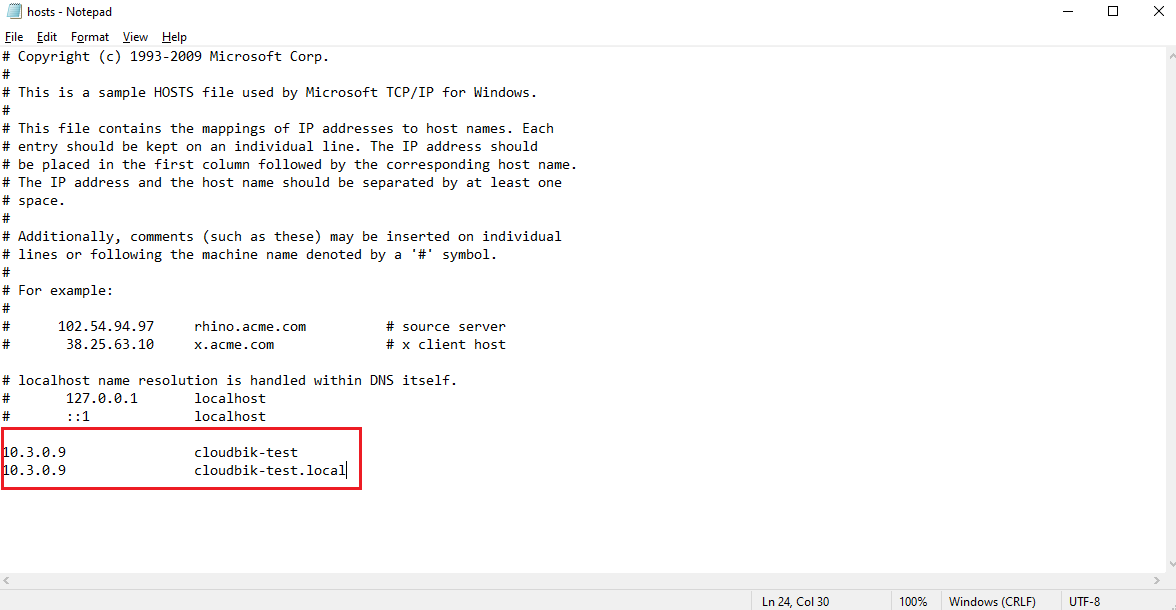
Now, we need to add the IP address of the server and domain in the hosts file of the windows.
- First go to C:\Windows\System32\drivers\etc and open the hosts file with notepad and at the end of the file add your domain with server I.P address as shown in the image and save it.
Now you need to connect your PC to the domain. For this follow the below steps.
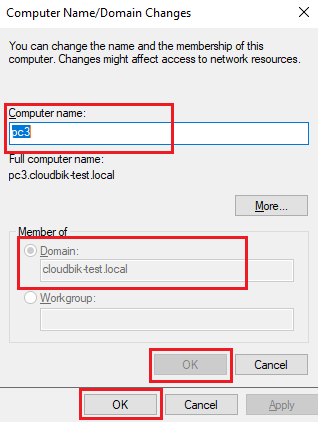
- Open the properties of your PC and click on rename this PC (advanced). Once done click on the change button to connect PC to domain.
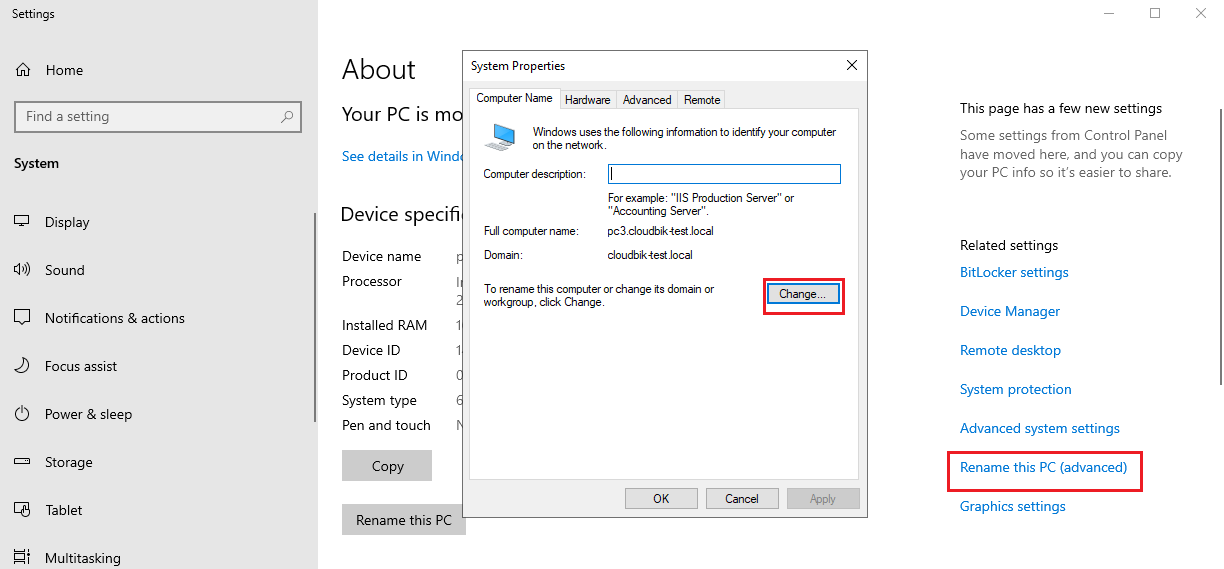
- In the member of, choose domain and type your domain name. Once done, click on apply and then OK button.
Once everything has been completed, restart your PC. Now we can install exchange server, but first we need to install some prerequisites for installing Exchange Server 2019.
Prerequisites to Install Exchange Server 2019
To install Exchange server, you need to install some pre-requisites needed before installing the exchange setup.
Install latest .NET Framework
Download the .NET 4.8 and install it on your pc. Remember to install it as an administrator. Once installed you need to restart your PC for completing the installation.
Install Visual C++ Redistributable Package
Download Visual C++ Redistributable Package for Visual Studio 2012 and Visual Studio 2013 and install it as administrator on your PC.
Install IIS Rewrite Module
Download and install the IIS Rewrite Module on your PC from this link: IIS Rewrite Module
Install Unified Communications Managed API 4.0
Download and Install Unified Communications Managed API 4.0 on your system.
Install Server Media Foundation
To install server media foundation, you need to use the Windows PowerShell.
- Open Windows PowerShell and run it as administrator.
- Run the below command in the PowerShell.
Install-WindowsFeature Server-Media-Foundation
Install Remote Server Administration Toolkit
In the Windows PowerShell, run the below command.
Install-WindowsFeature NET-Framework-45-Features, RSAT-ADDS, RPC-over-HTTP-proxy, RSAT-Clustering, RSAT-Clustering-CmdInterface, RSAT-Clustering-Mgmt, RSAT-Clustering-PowerShell, Web-Mgmt-Console, WAS-Process-Model, Web-Asp-Net45, Web-Basic-Auth, Web-Client-Auth, Web-Digest-Auth, Web-Dir-Browsing, Web-Dyn-Compression, Web-Http-Errors, Web-Http-Logging, Web-Http-Redirect, Web-Http-Tracing, Web-ISAPI-Ext, Web-ISAPI-Filter, Web-Lgcy-Mgmt-Console, Web-Metabase, Web-Mgmt-Console, Web-Mgmt-Service, Web-Net-Ext45, Web-Request-Monitor, Web-Server, Web-Stat-Compression, Web-Static-Content, Web-Windows-Auth, Web-WMI, Windows-Identity-Foundation
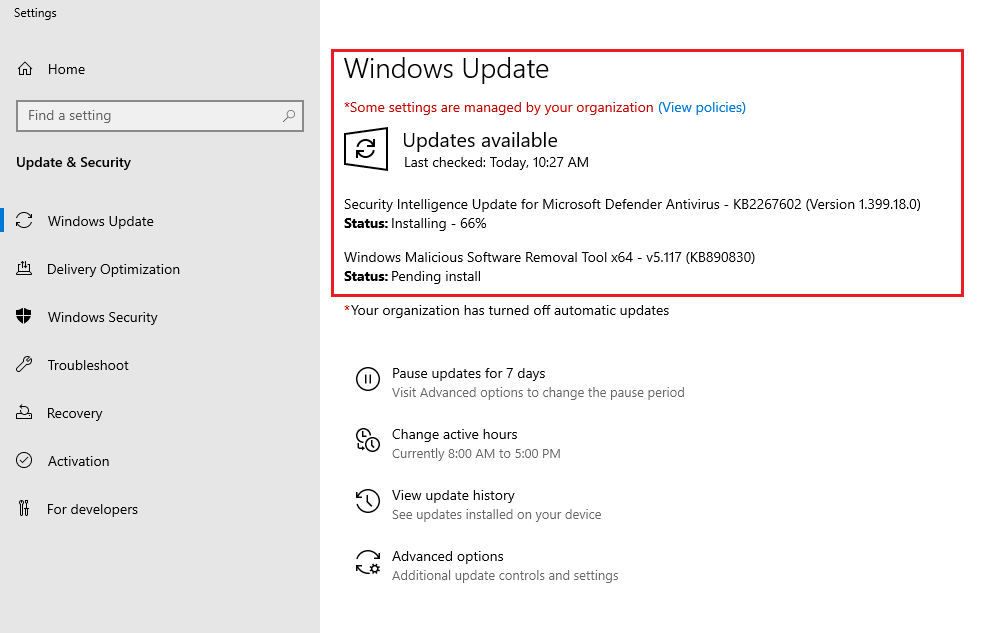
Check for Windows Updates
You need to install all windows update before installing any version of Exchange Server including 2019.
Once all the updates have been installed successfully, you are good to go to install Exchange Server.
Steps to Install Exchange Server 2019
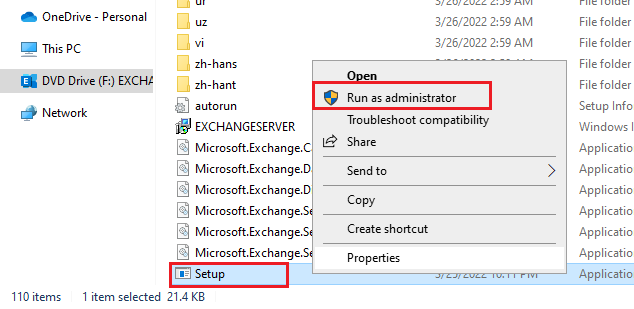
First you need to download the Exchange server 2019 setup file if you do not have it. Once downloaded, mount the setup file.
Prepare Active Directory Schema
Run the below command in the windows PowerShell.
F:\Setup.exe /IAcceptExchangeServerLicenseTerms_DiagnosticDataOn /PrepareSchema
Prepare Active Directory
In Windows PowerShell, run the below command.
F:\Setup.exe /IAcceptExchangeServerLicenseTerms_DiagnosticDataOn /PrepareAD /OrganizationName: “CLOUDBIK-TEST"
Prepare Active Directory Domain
Run the below mentioned command in the Windows PowerShell.
F:\Setup.exe /IAcceptExchangeServerLicenseTerms_DiagnosticDataOn /PrepareDomain:cloudbik-test.local
Install Exchange Server 2019
Follow the below procedure to completely install Exchange Server 2019 on your Azure Virtual Machine.
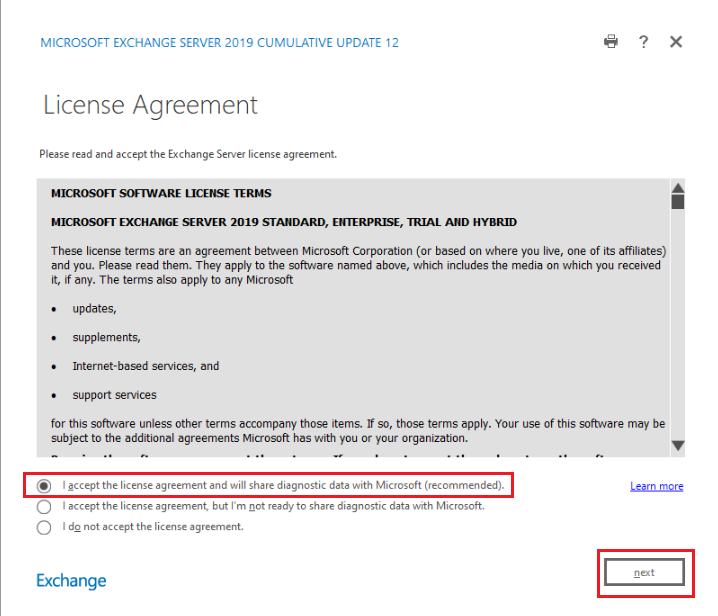
- Run setup.exe file as administrator.
- Accept the terms in the License Agreement and click next.
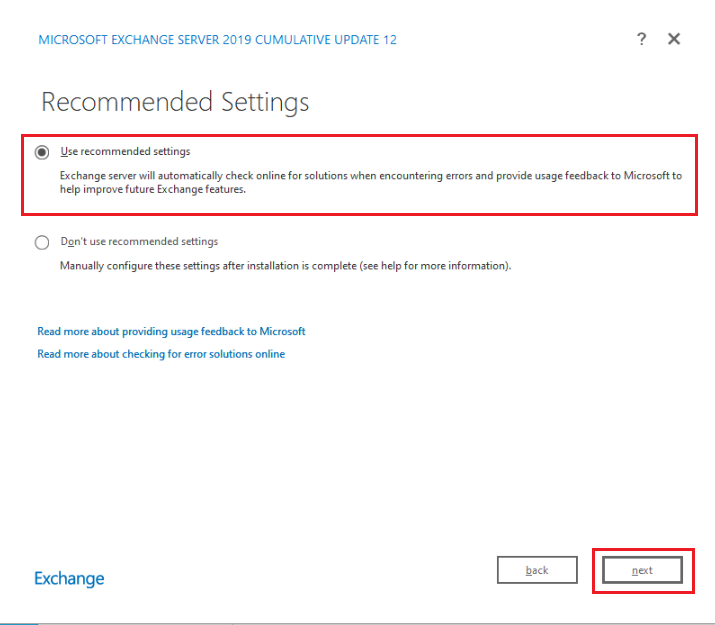
- Choose use recommended settings and click on the next button.
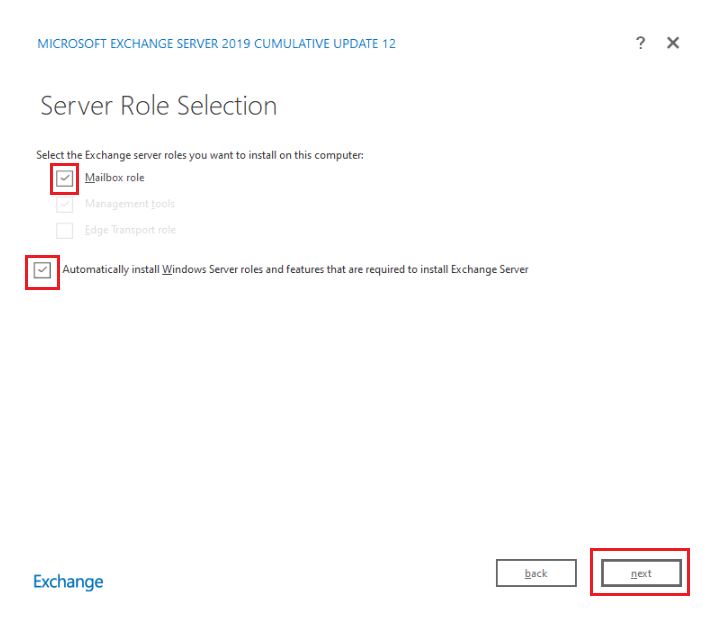
- In the server role selection window, choose Mailbox rule and also check on automatically install windows server roles and features. Once done, click on the next button.
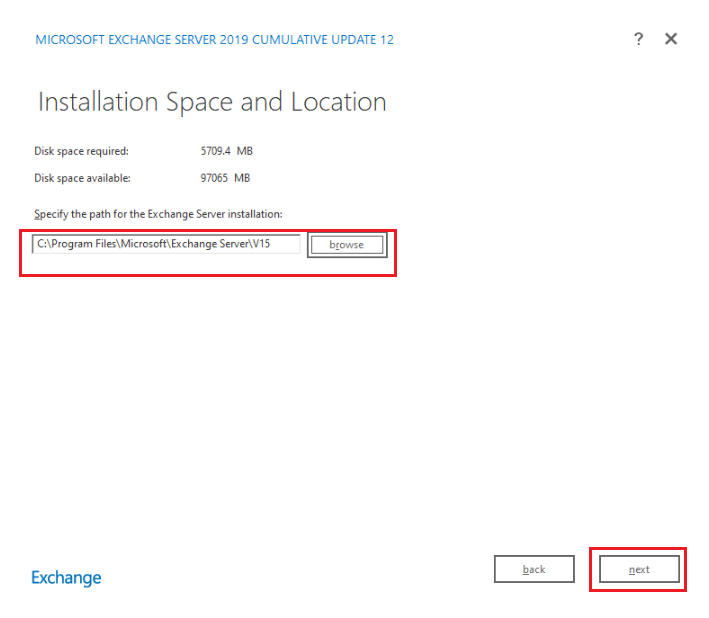
- On installation space and location window, specify the path for Exchange Server 2019 installation and click next.
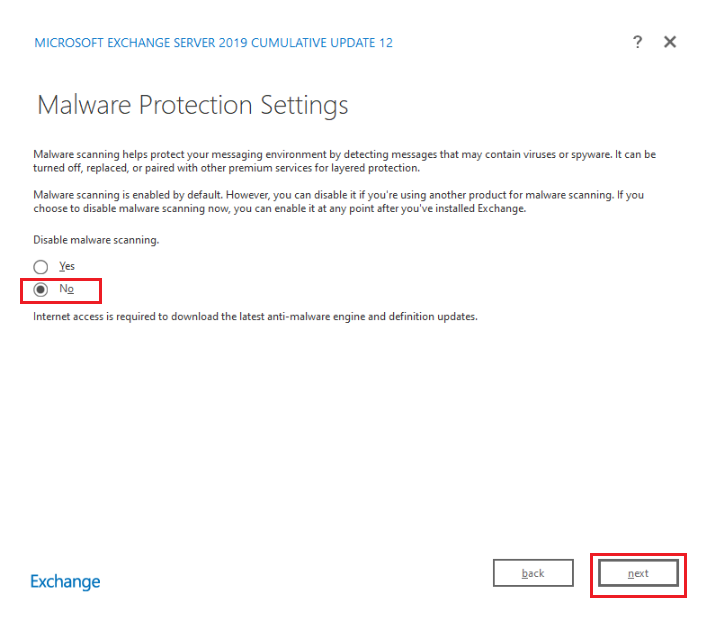
- In the malware protection setting window, choose the No option and click on the next button.
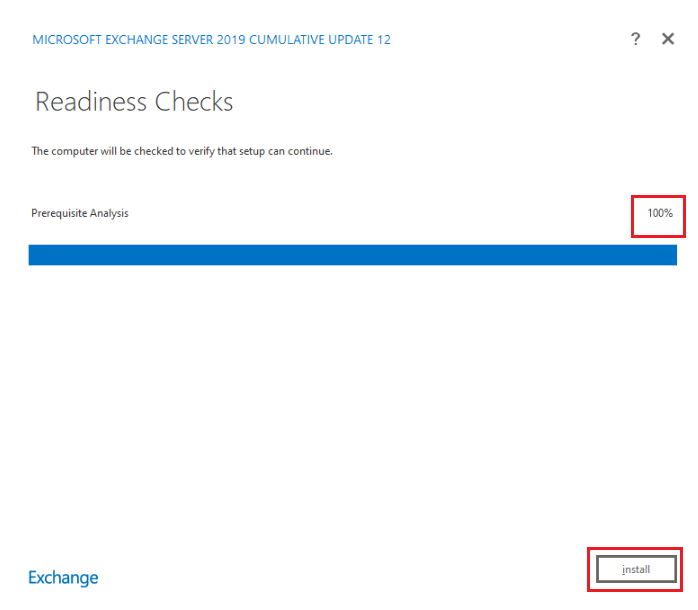
- Once done, it will check for the prerequisite needed to Install Exchange Server 2019 has been installed or not. If not, it will provide you with errors that you need to resolve. Once the analysis has been completed successfully, you need to click on the Install button.
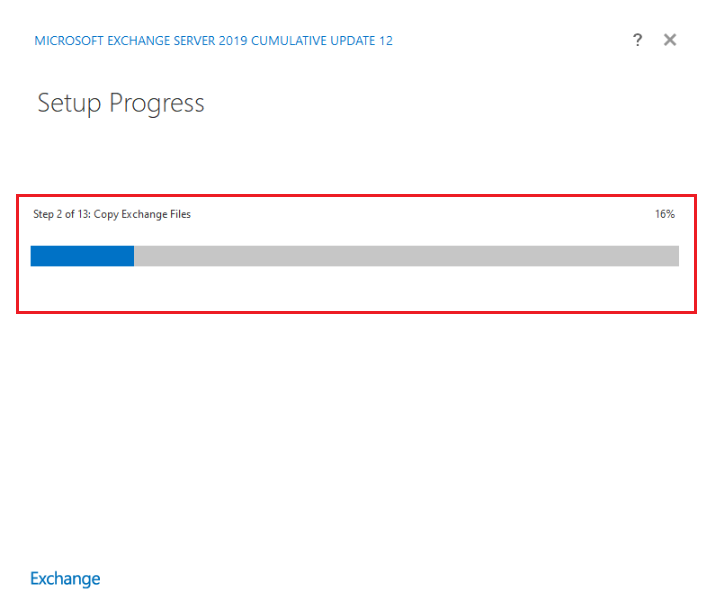
- Setup progress window will open and show the progress of Installation of the Exchange Server 2019.
- Once the setup has been completed, click on the finish button.
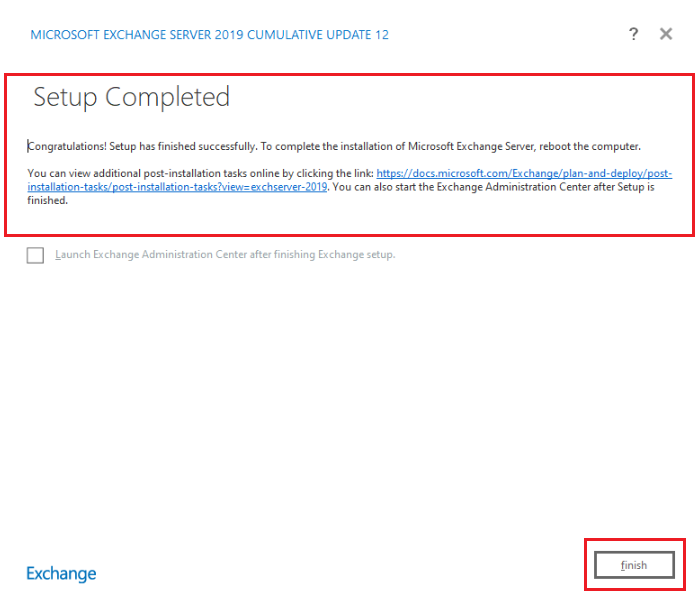
Now you have successfully installed the Exchange Server 2019. You can verify the installation.
Verify Exchange Server 2019 Installation
To verify exchange server installation, open Exchange Management Shell and run the below command.
Get-ExchangeServer
It will provide you the result of the Exchange Server Database, Server Role, Site, Edition and Version.
Conclusion:
This article describes how to install Exchange Server 2019 on Windows Server 2019 running on Azure Virtual Machine. Exchange Server provides full control to admin over their organization and is very secure. I hope this article has provided you with valuable insight on installing exchange server from scratch. If you have any queries regarding this, feel free to ask.

